Photopus is such a tool, capable of resizing hundreds of your photos in just one go. Whether you would like to resize the photos to fit in your monitor, reduce photo file size so that it will take less of your hard disk space, or share it with your friends when large photo size is a problem.
By using Photopus, you will no longer need to resize the photo one by one. We designed Photopus to resize hundreds of your photos with ready preset for most common output sizes in just 3 simple steps.
Step 1: Add Photos
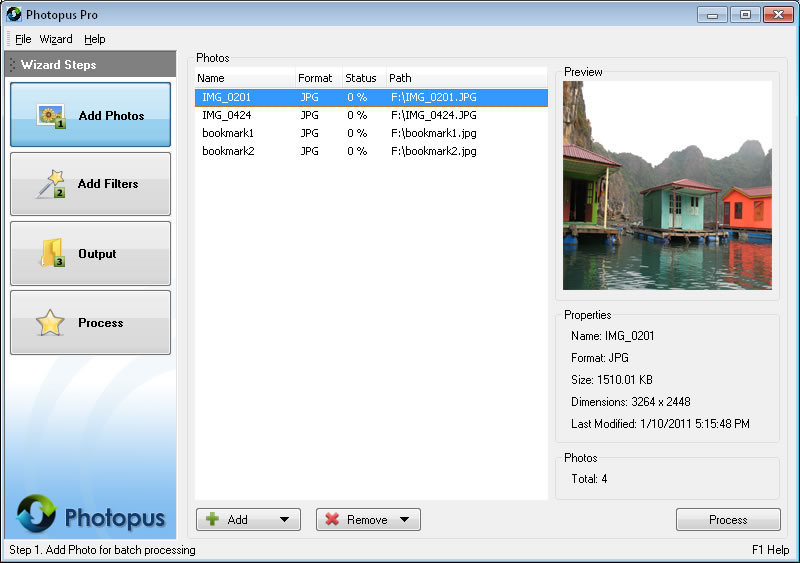
a. Click on Add button at the bottom and select Add Photo (s)
b. Select the photos that you would like to resize
c. To remove photo from resizing, select the photo and click on Remove button at bottom and select Remove.
Step 2: Add Filters
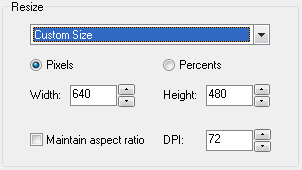
a. By default the output photos width and height will be the same as the source photo width and height. To specify a custom width x height, select Custom Size under the Resize combo box.
Pixels - Customize the output width and height in pixel values
Percents - Customize the output width and height in percentage values
Width - Output photo new width in pixel or percentage
Height - Output photo new height in pixel or percentage
Maintain aspect ratio - Checked this option to have the output photo maintaining the aspect ratio
DPI - Change the new Dot Per Inch value
b. You may also use the ready preset instead of specify a custom width and height value manually. From the Resize combo box, select one of the following:
• Photo 4 x 6 inch (10 x 15 cm)
• Photo 5 x 7 inch (13 x 18 cm)
• Photo 6 x 8 inch (15 x 20 cm)
• Photo 8 x 10 inch (20 x 25 cm)
• 100 x 75 (avatar)
• 150 x 112 (thumbnail)
• 320 x 240 (for websites and email)
• 640 x 480 (for message boards)
• 800 x 600 (15-inch monitor)
• 1024 x 768 (17-inch monitor)
• 1280 x 1024 (19-inch monitor)
• 1600 x 1200 (21-inch monitor)
Step 3. Output
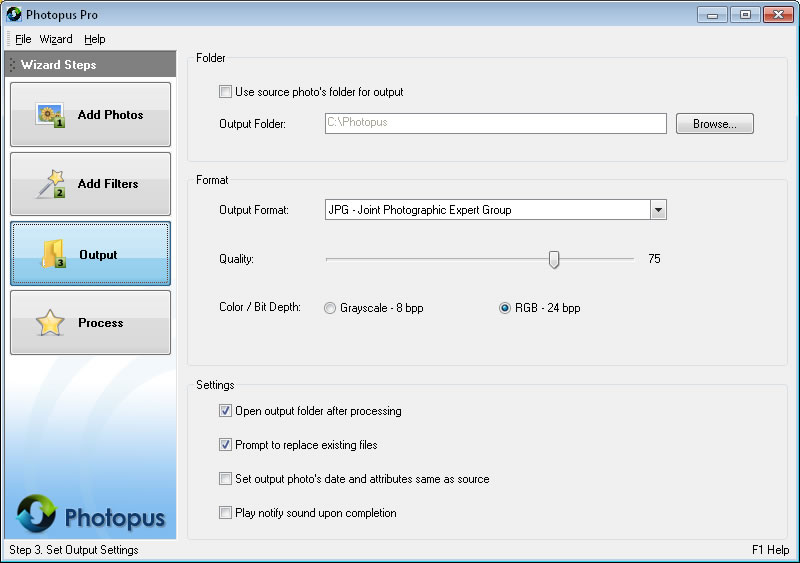
a.By default the output photos will be saved at C:\Photopus . To change the output location, click on Browse button and select a new location. To use the source photo's path as output, check the Use source photo's folder for output.
b. By default the output photo format will be JPEG. To change the output photo format, select a new output format from the combo box.
c. You may customized to have the output location folder opened after the processing; Prompt asking for overwriting existing photo file; Set the output photo meta information same as the source photo; Play notify sound upon completion.
Click on Process to start the processing.